结论
这篇教程只做一件事:让网站支持 使用 Google 登录,并把登录后的用户保存到 Supabase Auth。
最终效果:
- 用户点击
使用 Google 登录。 - 页面跳转到 Google 账号选择/授权页。
- Google 授权后跳回 Supabase。
- Supabase 创建或登录用户。
- 网站通过
/auth/callback写入登录 Cookie。 - 用户回到网站的用户中心。
不包含:Google Drive、Gmail、Calendar 等额外权限;也不包含支付、会员系统和后台管理系统。
第 1 步:确认你已经有 Supabase 项目
先打开 Supabase Dashboard:
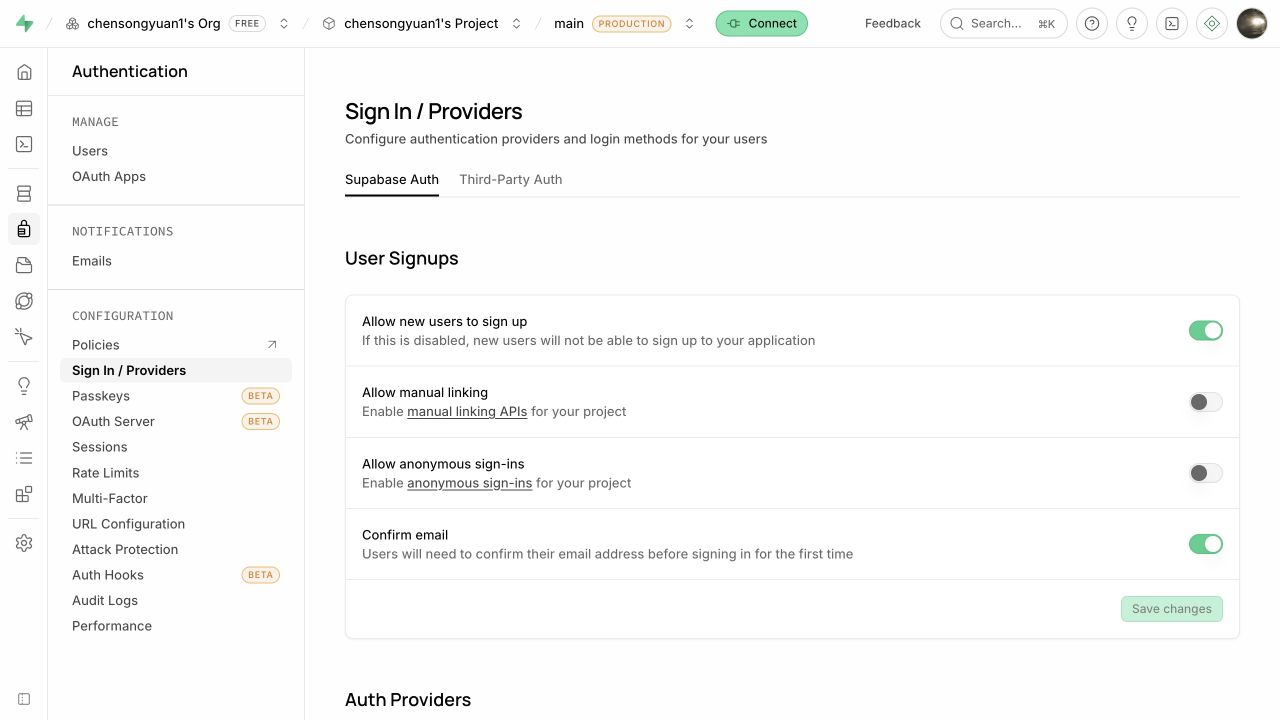
https://supabase.com/dashboard进入你的项目后,左侧菜单找到:
Authentication -> Sign In / Providers这里能看到所有登录方式。后面我们会启用其中的 Google。
第 2 步:复制 Supabase 的 OAuth Callback URL
在 Sign In / Providers 页面里找到 Google,点击这一行。
右侧会打开 Google Provider 配置面板。先不用填 Client ID 和 Secret,先找到:
Callback URL (for OAuth)这个地址长得像这样:
https://你的项目ref.supabase.co/auth/v1/callback点击旁边的 Copy 复制它。这个地址后面要填到 Google Cloud 的 Authorized redirect URIs。
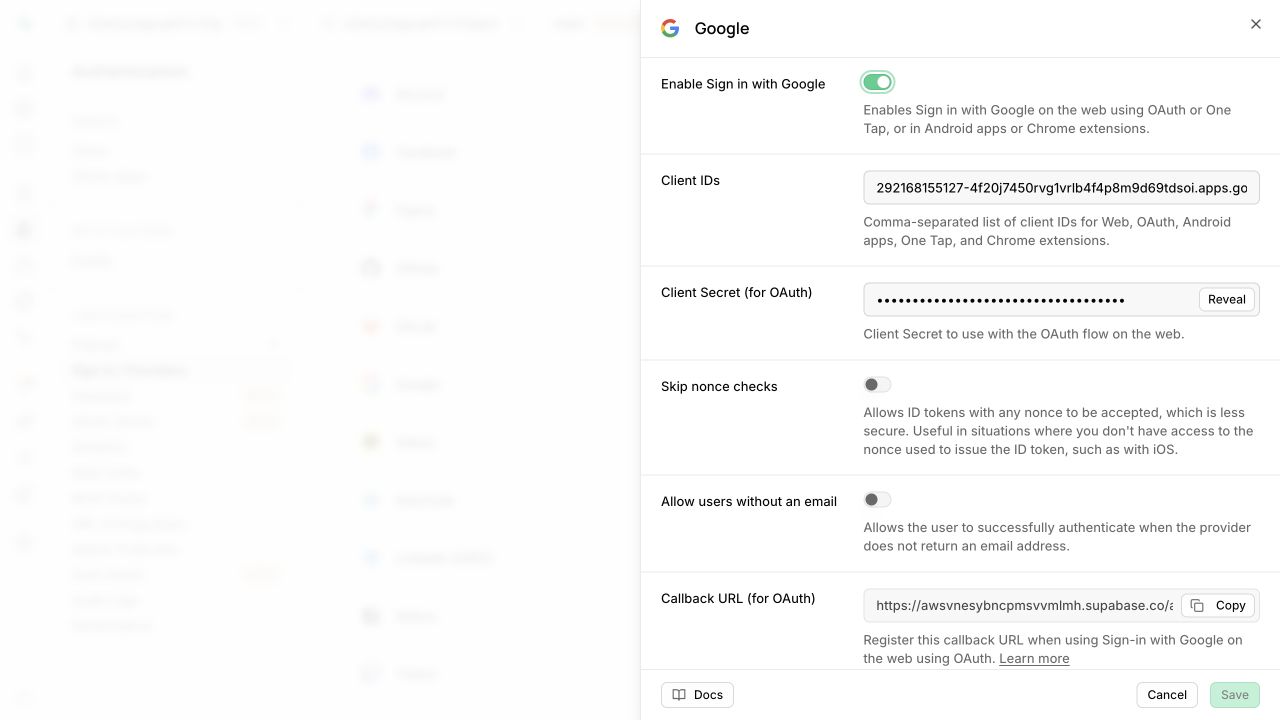
注意:这个回调地址不是你网站里的 /auth/callback。
Google OAuth 第一跳必须先回到 Supabase 的:
https://xxx.supabase.co/auth/v1/callback然后 Supabase 才会再跳回你代码里配置的:
http://localhost:3000/auth/callback第 3 步:配置 Supabase 的站点跳转地址
进入:
Authentication -> URL Configuration本地开发时先这样填:
Site URL
http://localhost:3000

Redirect URLs
http://localhost:3000/auth/callback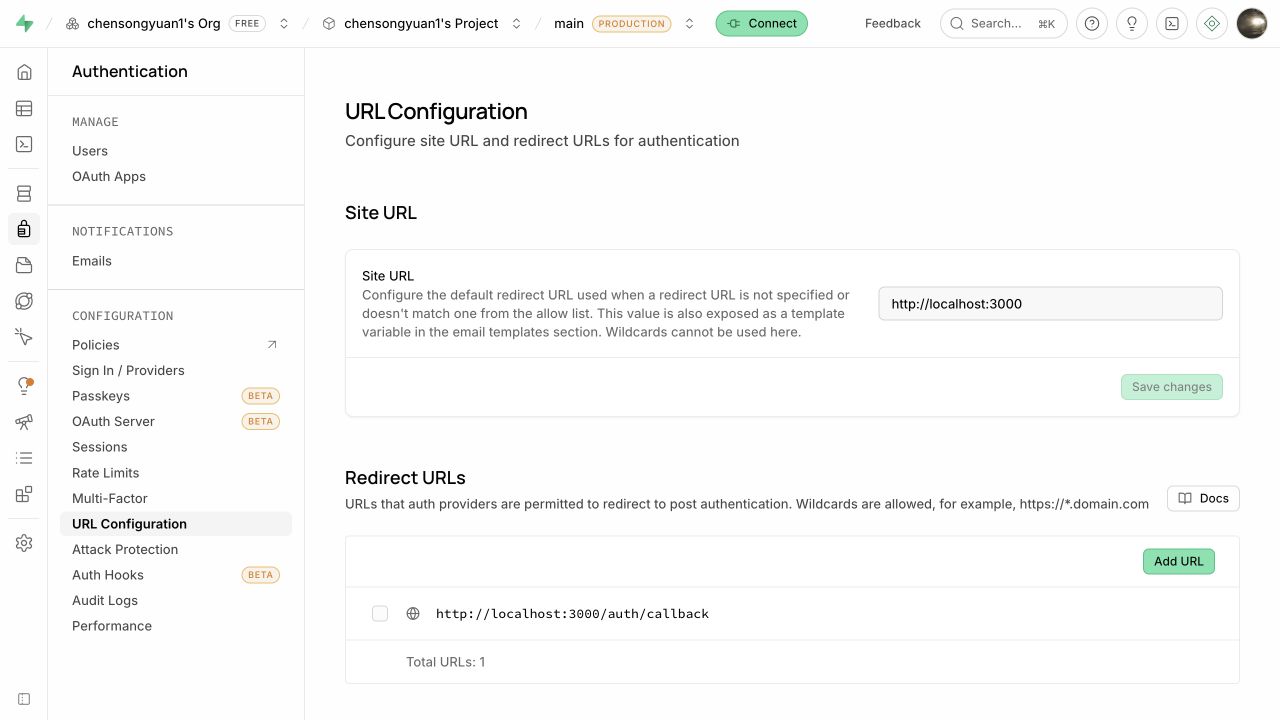
上线后还要追加正式域名,例如:
Site URL
https://your-domain.com

Redirect URLs
https://your-domain.com/auth/callback
不要删掉本地地址。开发环境和线上环境可以同时保留。
第 4 步:打开 Google Auth Platform
打开 Google Cloud Console:
https://console.cloud.google.com选择或创建一个 Google Cloud 项目,然后进入:
Google Auth Platform左侧会看到这些菜单:
概览
品牌塑造
目标对象
客户端
数据访问
验证中心
设置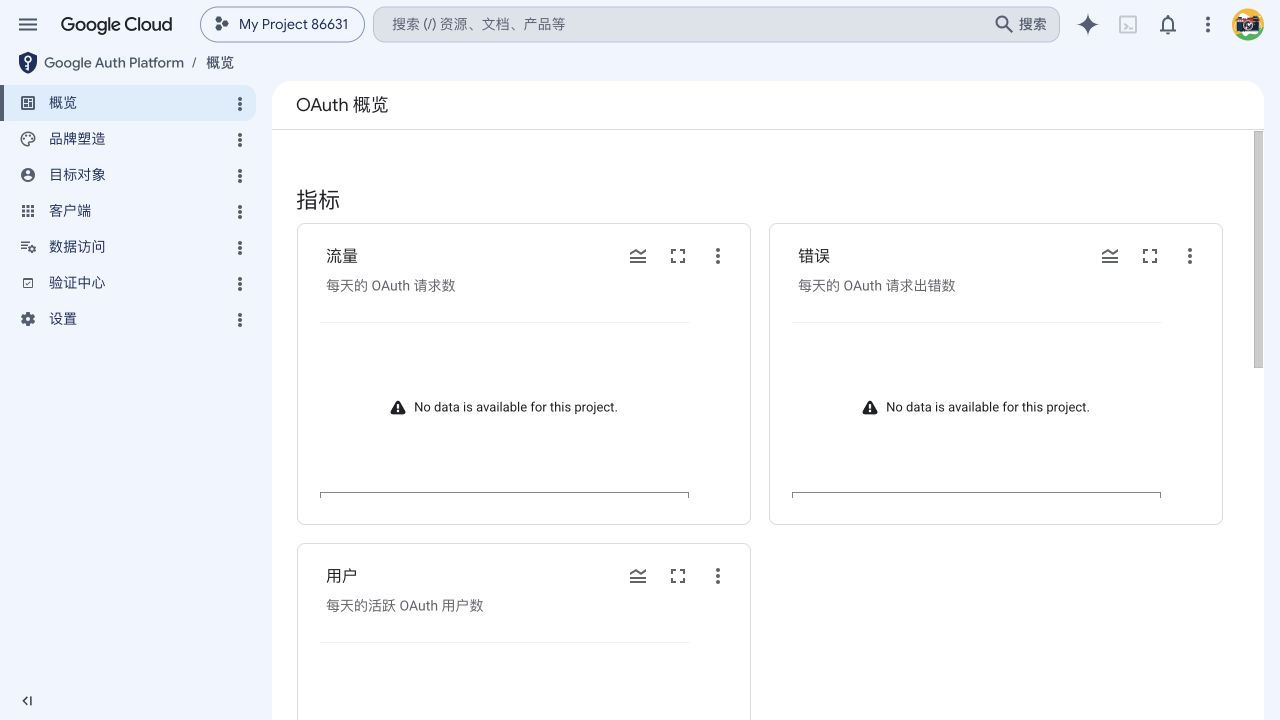
如果是第一次使用,Google 会要求你先配置应用信息。
第 5 步:配置 Google 授权页面
进入:
Google Auth Platform -> 品牌塑造按提示填写:
应用名称
你的网站或产品名

用户支持电子邮件
选择你的 Google 邮箱

开发者联系信息
填写你的邮箱
然后进入:
Google Auth Platform -> 目标对象如果你的网站面向普通用户,选择:
External如果还没有发布,可以保持测试状态。测试状态下,只有测试用户可以登录。
第 6 步:创建 OAuth 客户端
进入:
Google Auth Platform -> 客户端点击:
创建客户端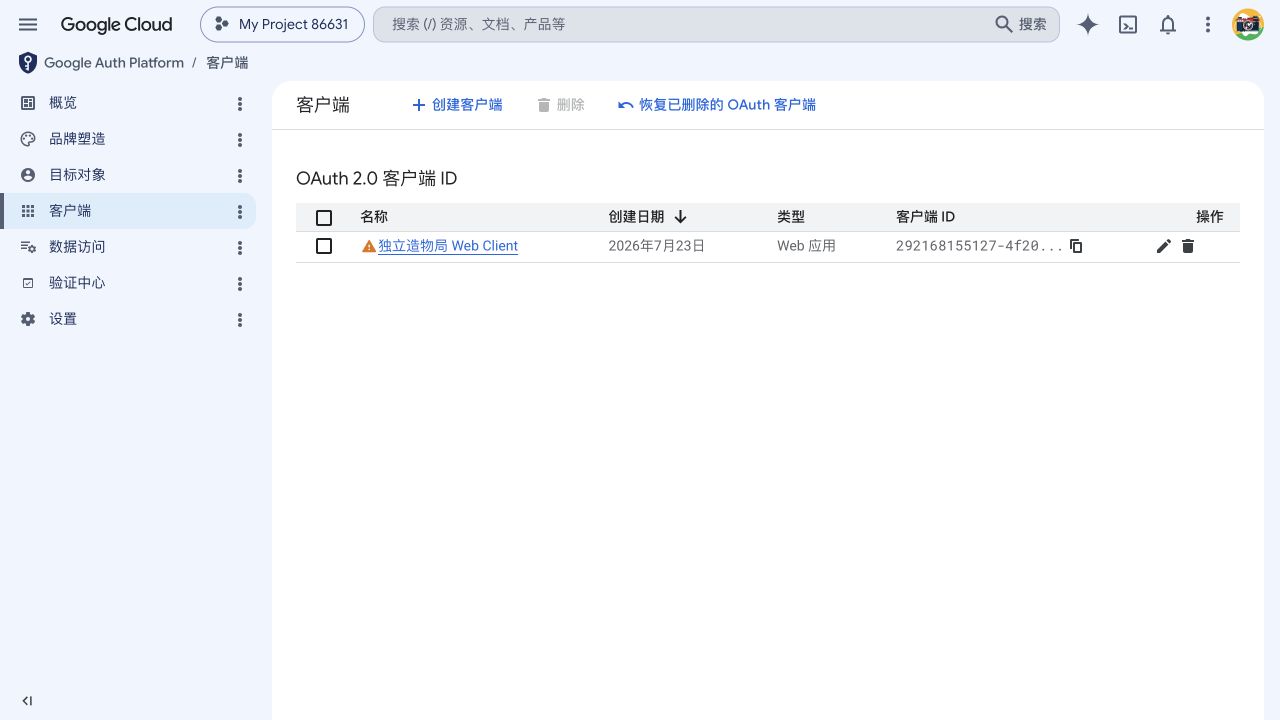
在创建页面里,应用类型 选择:
Web 应用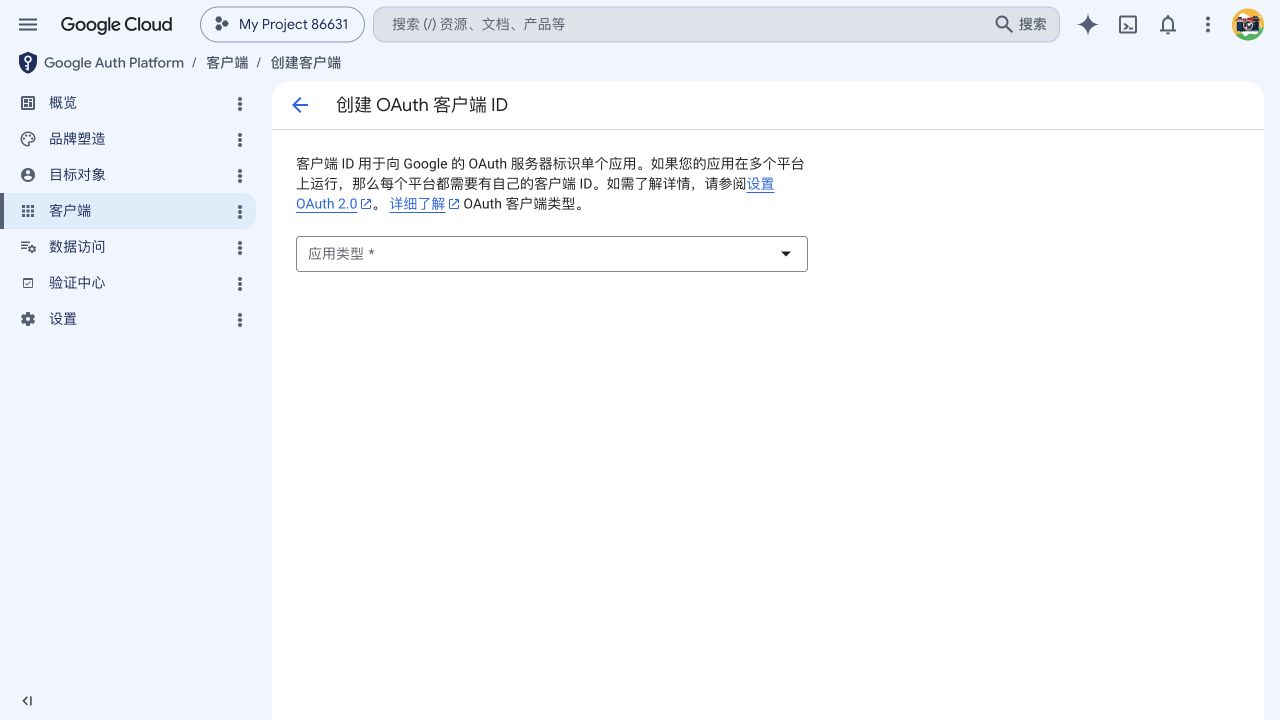
然后填写客户端名称,例如:
独立站 Web Client这个名称只在 Google Cloud 控制台里显示,用户不会看到。
第 7 步:填写 Authorized JavaScript origins
在 Google OAuth Client 表单里找到:
已获授权的 JavaScript 来源点击 添加 URI,本地开发填:
http://localhost:3000注意:
- 这里不要加路径。
- 不要写成
http://localhost:3000/auth/callback。 - 本地开发是
http,不是https。 - 端口必须和你的本地项目端口一致。
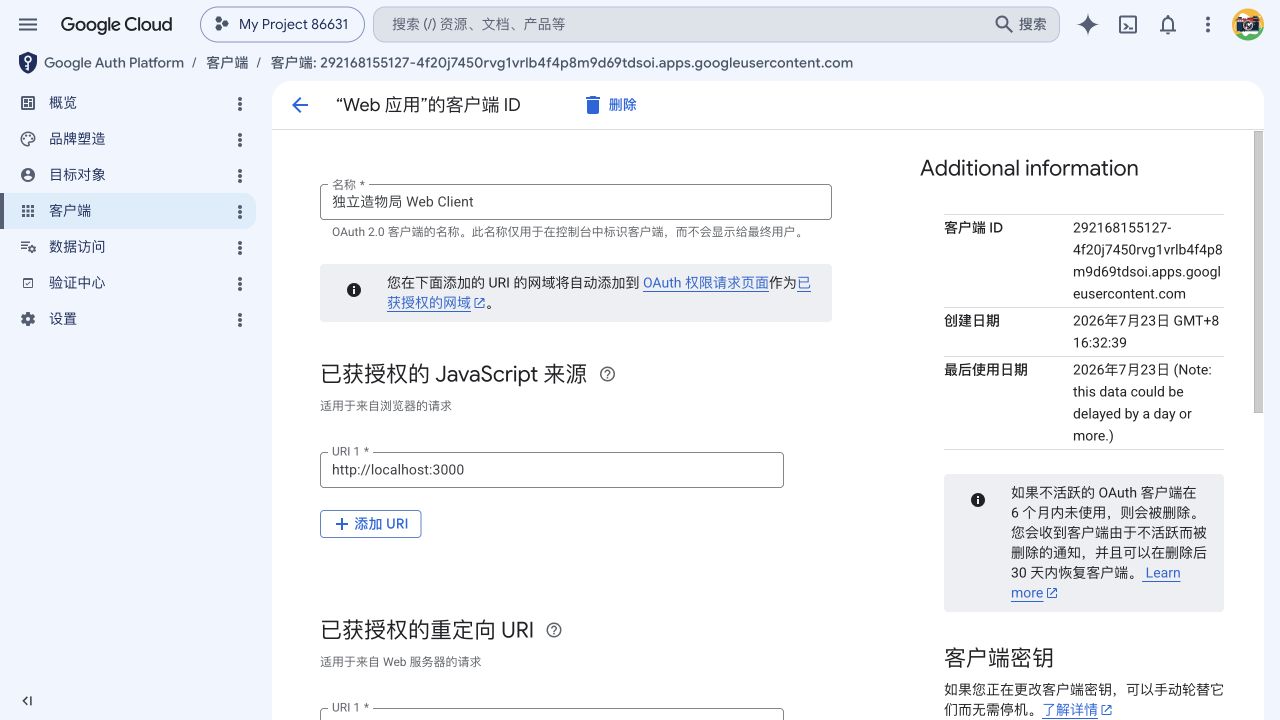
上线后再追加正式域名:
https://your-domain.com第 8 步:填写 Authorized redirect URIs
继续往下找到:
已获授权的重定向 URI点击 添加 URI,填第 2 步从 Supabase 复制的 Callback URL:
https://你的项目ref.supabase.co/auth/v1/callback示例:
https://abcdefghijklmnop.supabase.co/auth/v1/callback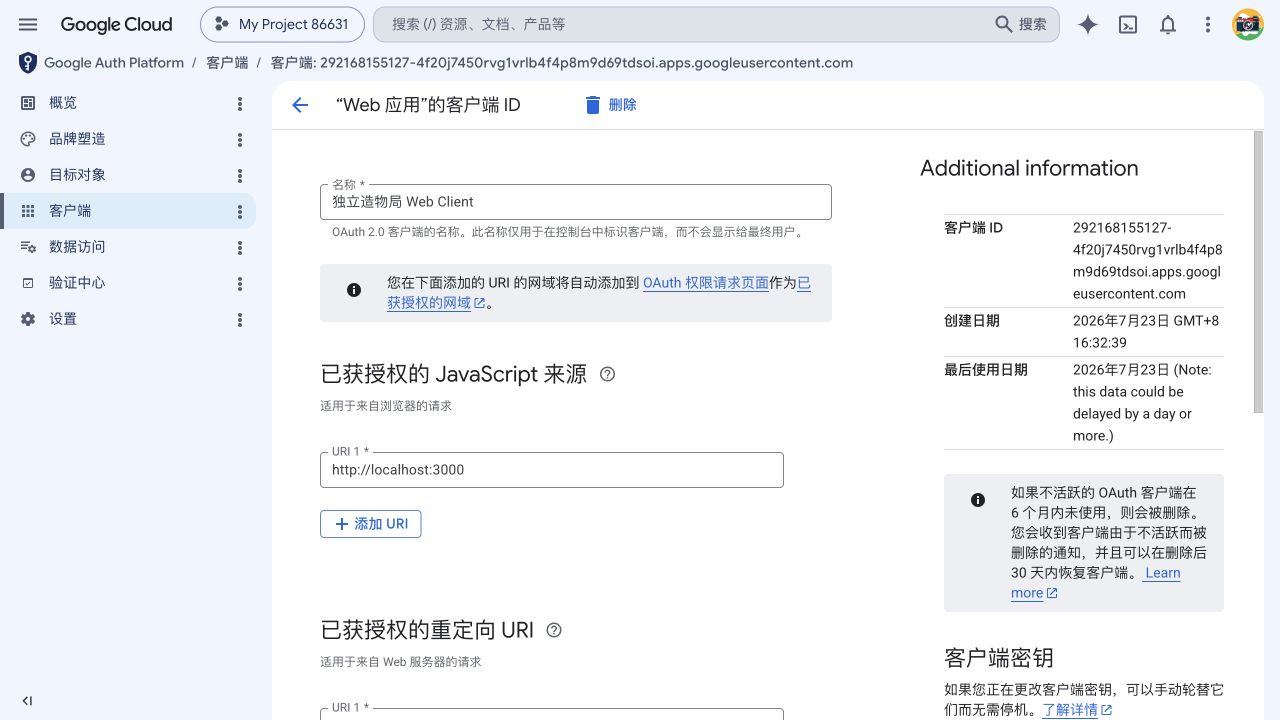
这里最容易填错。重点是:
- 这是 Supabase 的回调地址,不是你网站的
/auth/callback。 - 必须是
https://xxx.supabase.co/auth/v1/callback。 - 末尾不要多加
/。 - 项目 ref 必须和你的 Supabase 项目一致。
如果这里填错,登录时通常会看到:
redirect_uri_mismatch第 9 步:创建并保存 Client ID / Client Secret
点击 Google 页面底部的:
创建创建成功后,Google 会给你:
Client ID
Client Secret
你需要立刻保存这两个值。
注意:
Client ID可以再次看到。Client Secret创建后可能只能看一次。- 不要把
Client Secret写进前端代码。 - 不要把
Client Secret提交到 Git。 - 如果 Secret 丢了,就在 Google 客户端详情页新增一个 Secret,然后把新的 Secret 填回 Supabase。
第 10 步:回到 Supabase 启用 Google Provider
回到 Supabase:
Authentication -> Sign In / Providers -> Google打开:
Enable Sign in with Google填写:
Client IDs
填 Google Cloud 生成的 Client ID

Client Secret (for OAuth)
填 Google Cloud 生成的 Client Secret
然后点击:
Save保存成功后,Provider 列表里的 Google 会显示:
Enabled第 11 步:安装 Supabase 客户端依赖
如果项目还没安装 Supabase,执行:
npm install @supabase/supabase-js @supabase/ssr如果已经安装,可以跳过。
第 12 步:配置环境变量
在项目根目录创建或修改:
.env.local写入:
NEXT_PUBLIC_SUPABASE_URL=https://你的项目ref.supabase.co
NEXT_PUBLIC_SUPABASE_ANON_KEY=你的anon public key
这两个值在 Supabase 后台这里找:
Project Settings -> API注意:NEXT_PUBLIC_SUPABASE_ANON_KEY 是前端可用的匿名公钥,不是数据库密码,也不是 service role key。
第 13 步:创建浏览器端 Supabase Client
新建:
src/lib/supabase/client.ts代码:
"use client";

import { createBrowserClient } from "@supabase/ssr";

export function createClientSupabase() {
  const url = process.env.NEXT_PUBLIC_SUPABASE_URL;
  const anonKey = process.env.NEXT_PUBLIC_SUPABASE_ANON_KEY;

  if (!url || !anonKey) {
    return null;
  }

  return createBrowserClient(url, anonKey);
}
第 14 步:创建服务端 Supabase Client
新建:
src/lib/supabase/server.ts代码:
import { cookies } from "next/headers";
import { createServerClient } from "@supabase/ssr";

export async function createServerSupabase() {
  const url = process.env.NEXT_PUBLIC_SUPABASE_URL;
  const anonKey = process.env.NEXT_PUBLIC_SUPABASE_ANON_KEY;

  if (!url || !anonKey) {
    return null;
  }

  const cookieStore = await cookies();

  return createServerClient(url, anonKey, {
    cookies: {
      getAll() {
        return cookieStore.getAll();
      },
      setAll(cookiesToSet) {
        try {
          cookiesToSet.forEach(({ name, value, options }) => cookieStore.set(name, value, options));
        } catch {
          // Server Components cannot set cookies; auth routes and actions can.
        }
      }
    }
  });
}
第 15 步:登录按钮调用 Google OAuth
在登录组件里添加 Google 登录按钮。
核心代码:
"use client";

import { createClientSupabase } from "@/lib/supabase/client";

export function GoogleLoginButton() {
  const supabase = createClientSupabase();

  async function handleGoogleLogin() {
    if (!supabase) return;

    await supabase.auth.signInWithOAuth({
      provider: "google",
      options: {
        redirectTo: `${location.origin}/auth/callback?next=/account`
      }
    });
  }

  return (
    <button onClick={handleGoogleLogin} type="button">
      使用 Google 登录
    </button>
  );
}
这里的 redirectTo 是登录完成后,Supabase 再跳回你网站的地址。
本地开发时实际会是:
http://localhost:3000/auth/callback?next=/account第 16 步:创建 Auth Callback 路由
新建:
src/app/auth/callback/route.ts代码:
import { NextRequest, NextResponse } from "next/server";
import { createServerSupabase } from "@/lib/supabase/server";

export async function GET(request: NextRequest) {
  const requestUrl = new URL(request.url);
  const code = requestUrl.searchParams.get("code");
  const nextParam = requestUrl.searchParams.get("next") || "/account";
  const next = nextParam.startsWith("/") && !nextParam.startsWith("//") ? nextParam : "/account";

  if (!code) {
    return NextResponse.redirect(new URL("/login?error=missing_code", requestUrl.origin));
  }

  const supabase = await createServerSupabase();
  if (!supabase) {
    return NextResponse.redirect(new URL("/login?error=supabase_not_configured", requestUrl.origin));
  }

  const { error } = await supabase.auth.exchangeCodeForSession(code);
  if (error) {
    return NextResponse.redirect(new URL(`/login?error=${encodeURIComponent(error.message)}`, requestUrl.origin));
  }

  return NextResponse.redirect(new URL(next, requestUrl.origin));
}
这一步非常关键。没有 exchangeCodeForSession(code),数据库里可能已经有用户,但你的网站读不到登录态。
第 17 步:创建登录后的账号页
新建:
src/app/account/page.tsx代码:
import { redirect } from "next/navigation";
import { createServerSupabase } from "@/lib/supabase/server";

export default async function AccountPage() {
  const supabase = await createServerSupabase();
  if (!supabase) redirect("/login");

  const {
    data: { user }
  } = await supabase.auth.getUser();

  if (!user) redirect("/login");

  return (
    <main>
      <h1>用户中心</h1>
      <p>{user.email}</p>
    </main>
  );
}
登录成功后,如果这里能显示邮箱,说明网站已经能从 Supabase session 里读到当前用户。
第 18 步:本地启动测试
启动项目:
npm run dev打开:
http://localhost:3000/login点击:
使用 Google 登录正常流程:
- 跳到 Google。
- 选择 Google 账号。
- 第一次使用时确认授权。
- 回到你的网站
/auth/callback。 - 自动跳到
/account。 - 页面显示用户邮箱。
第 19 步:去 Supabase 验证用户是否创建
登录成功后,回到 Supabase:
Authentication -> Users你应该能看到一条新用户记录。
如果你创建了 profiles 表和 handle_new_user trigger,也可以进入:
Table Editor -> profiles检查是否同步了:
email
display_name
avatar_url
第 20 步:理解 Google 登录的注册逻辑
Google 登录没有严格区分“登录”和“注册”。
默认逻辑是:
- 如果 Supabase 已经有这个 Google 用户,就是登录。
- 如果 Supabase 没有这个 Google 用户,并且允许新用户注册,就是自动注册并登录。
所以用户第一次点 使用 Google 登录 时,不需要先走一个单独的注册表单。
如果你删除了 Supabase 里的用户,用户下次用同一个 Google 账号登录时,Supabase 会重新创建一条用户记录。
第 21 步:为什么第二次 Google 登录不再弹授权页
第一次授权后,Google 会记住这个账号已经允许你的应用读取基础信息。
你删除 Supabase 用户,不会删除 Google 账号里的授权记录。
如果想重新看到授权确认页,需要到 Google 账号里移除授权:
https://myaccount.google.com/connections路径:
Google 账号 -> 安全性 -> 你与第三方应用和服务的关联 -> 找到应用 -> 移除访问权限移除后,再次点击 Google 登录,Google 才可能重新展示授权确认。
常见错误 1:redirect_uri_mismatch
原因:Google Cloud 里的重定向 URI 填错。
检查 Google Cloud:
Google Auth Platform -> 客户端 -> 你的 Web Client -> 已获授权的重定向 URI必须填 Supabase Callback URL:
https://你的项目ref.supabase.co/auth/v1/callback不是:
http://localhost:3000/auth/callback常见错误 2:数据库里有用户,但页面还在登录页
原因通常是网站没有把 OAuth code 换成 Supabase session。
检查:
- 是否存在
src/app/auth/callback/route.ts。 - 是否调用了
exchangeCodeForSession(code)。 - Supabase
Redirect URLs是否包含http://localhost:3000/auth/callback。 - 登录按钮的
redirectTo是否是${location.origin}/auth/callback。
常见错误 3:Google Provider 已启用,但点击登录报错
检查 Supabase:
Authentication -> Sign In / Providers -> Google确认:
Enable Sign in with Google: 开启
Client IDs: 已填写
Client Secret: 已填写
如果 Client Secret 丢了,不要猜,也不要用尾号。去 Google Cloud 客户端详情页新增一个 Secret,再填回 Supabase。
常见错误 4:测试用户不能登录
如果 Google Auth Platform 还处于测试状态,只有测试用户可以登录。
检查:
Google Auth Platform -> 目标对象如果是测试模式,需要把测试账号加入测试用户列表。
正式上线后,再按 Google 要求补齐应用信息和验证流程。
上线前检查清单
上线前至少检查这些:
- Supabase
Site URL改成正式域名。 - Supabase
Redirect URLs增加正式回调地址。 - Google
Authorized JavaScript origins增加正式域名。 - Google
Authorized redirect URIs保留 Supabase callback URL。 .env.local不提交到 Git。- 线上环境变量里配置 Supabase URL 和 anon key。
- 不把 Google Client Secret 写进前端代码。
- 本地和线上都测试一次完整 Google 登录。
最小链路图
用户点击 Google 登录
  -> Supabase signInWithOAuth("google")
  -> Google 账号选择/授权
  -> https://你的项目ref.supabase.co/auth/v1/callback
  -> http://localhost:3000/auth/callback
  -> exchangeCodeForSession(code)
  -> /account
记住一句话:Google Cloud 配 Supabase callback,Supabase 配你网站 callback,代码里负责把 code 换成 session。